Welcome to DieselRocket's Military Modeling, coming to you from Texas, USA. Blogging on military model builds including armor, aircraft, ships, and figures.
Showing posts with label Vallejo. Show all posts
Sunday, May 8, 2016
Northern Alliance (Afghanistan) T-55 by Gary Boggs
Tamiya 1:35th scale Northern Alliance (Afghanistan) T-55. Finished with Tamiya and Vallejo acrylics, MIG pigments, various filters and oil washes, AK Interactive and MIG finishing products. Scratch-built handles, fuel line assemblies, and tarp. Airbrushed using an Iwata Neo and Iwata Eclipse.
Thursday, April 7, 2016
Royal Irish Grenadier by David Lakin
Romeo Models' Royal Irish Grenadier, 18th Regiment of Foot, 1751. 75mm kit sculpted by Maurzio Bruno and finished with Vallejo acrylics. The ground work and rotting stump were sculpted using Apoxie Sculpt and the leaves are made from parsley flakes.
Wednesday, December 10, 2014
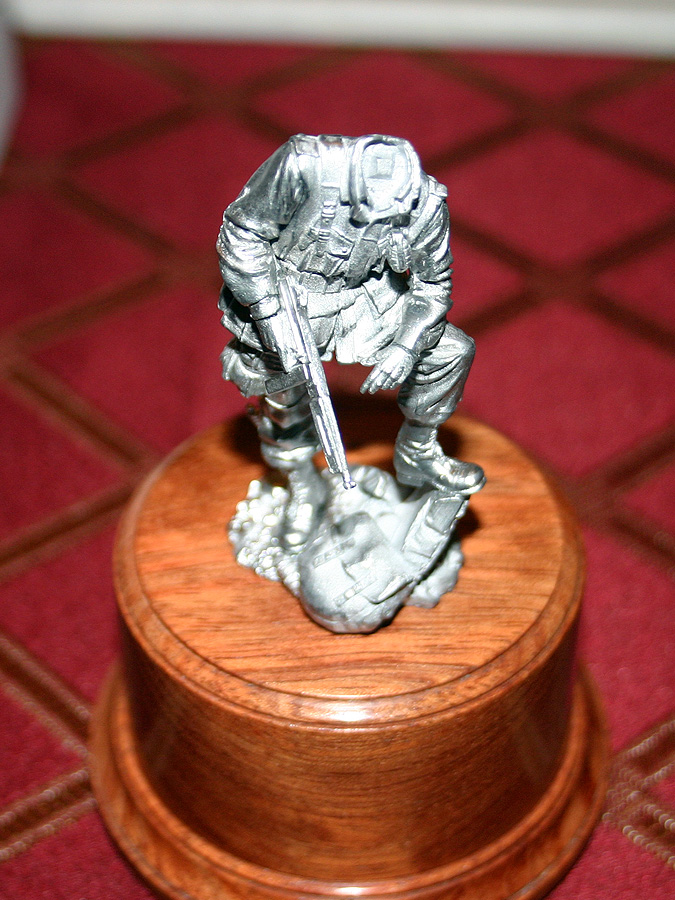
Scale 75 Lt. Dick Winters - Part 2
Read Part I Here
Part 2 of the excellent Scale 75 Lt. Winters (of 'Band of Brothers' fame) kit. The kit is cast in white metal and is sculpted by Fernando Martin. Box art is outstanding and is the work of Samuel Perez.
I've had this one sitting around finished for about a year now and haven't gotten around to taking photos. Not the best photographic work I've done, but will pass I think. 75mm, painted with Vallejo acrylics and mounted on Rosewood by Ken Thomas Art Bases.
Part 2 of the excellent Scale 75 Lt. Winters (of 'Band of Brothers' fame) kit. The kit is cast in white metal and is sculpted by Fernando Martin. Box art is outstanding and is the work of Samuel Perez.
I've had this one sitting around finished for about a year now and haven't gotten around to taking photos. Not the best photographic work I've done, but will pass I think. 75mm, painted with Vallejo acrylics and mounted on Rosewood by Ken Thomas Art Bases.
Thursday, April 3, 2014
Tamiya 1/48 BF109 E3 - Part III
Read Part I Here
Read Part II Here
Final pictures of the completed project. III JG.26, August 1940 - Major Adolf Galland
Read Part I Here
Read Part II Here
Read Part II Here
Final pictures of the completed project. III JG.26, August 1940 - Major Adolf Galland
Read Part I Here
Read Part II Here
Labels:
Aircraft,
BF-109,
Eduard,
German,
Iwata,
Kyle Guerry,
MIG,
Model Master,
Tamiya,
Vallejo
Saturday, November 30, 2013
French Voltageur 1809 by Gary Boggs
This is the 1/9th scale "French Voltageur 1809" bust from Sovereign 2000 (S2K). Gary assembled the kit out of the box and painted it with Vallejo acrylics.
www.sovereign2000.uk.com
Sunday, September 15, 2013
Tamiya 1/48 BF109 E3 - Part II
Read Part I Here
Read Part III Here
Two years ago I was inspired by the great collection of aircraft I had seen at Eagle Quest to start the build of the Tamiya BF109 E3. Unfortunately the inspiration didn't last long, and after building the cockpit she became a shelf queen.
A month ago I got her back out and decided to press on and finish, inspired once again from reading the book A Higher Call by Adam Makos. I didn't get a chance to blog the assembly of the kit other than the building of the cockpit in Part I - but here in Part II I cover the painting and decaling process.
After a coat of gloss using Future floor wax, I applied the decals over a three day period using a mix of decals supplied with the kit and decals from my aftermarket stash. Micro-Set and Micro-Sol were used to ensure snug decals without silvering.
Read Part III Here
Two years ago I was inspired by the great collection of aircraft I had seen at Eagle Quest to start the build of the Tamiya BF109 E3. Unfortunately the inspiration didn't last long, and after building the cockpit she became a shelf queen.
After priming the plane with Tamiya white primer, I used Tamiya XF-1 Flat Black to outline and pre-shade all panel lines.
Using Model Master acrylic paints, I began applying the main colors, starting with RLM 65 Hellblau for the areas on the bottom of the aircraft and the sides. For this model, I shot all of my main colors with an Iwata at 20psi. I thinned my paints using Model Master acrylic thinner at a ratio of about 20% thinner to paint.
In the next step, I cut out masks using printer paper in order to be able to create a "soft" hard edge scheme, as I'm building the Adolf Galland version of the plane that comes in the box (same as the box art). The light color in the camo is Model Master RLM 02 Grau while the dark color is Model Master RLM 71 Dunkelgrun.
For all of the three base colors I have allowed the pre-shade to slightly show through (not too strong!) and I shot the middle of the panels with lightened versions of the base coat colors to begin a bit of a contrast/weathering effect. I kept both of these techniques to a minimum as this plane was still relatively new when it saw service.
After a coat of gloss using Future floor wax, I applied the decals over a three day period using a mix of decals supplied with the kit and decals from my aftermarket stash. Micro-Set and Micro-Sol were used to ensure snug decals without silvering.
Once the decals had a day to set, I re-applied future to lock them in and gave it another day to dry. Using MIG dark wash and MIG thinner for washes, I spent a few days bringing out all of the panel lines. This was allowed to dry then followed with Vallejo semi-gloss varnish thinned with Vallejo thinners (and with a drop of slow dry added to help avoid "white specks") shot through the Iwata at about 20psi.
I hope to complete the model this week and Part III will cover final assembly, weathering, and some shots of the finished result.
Labels:
Aircraft,
BF-109,
Eagle Quest,
Eduard,
German,
Iwata,
Kyle Guerry,
MIG,
Model Master,
Tamiya,
Vallejo
Sunday, January 27, 2013
Gary Boggs - SMMI Feb. 2013
Update to the previous post of May 1, 2012.
DRMM is proud to announce that site contributor Gary Boggs and his Staghound have been published in the February, 2013 issue of Scale Military Modeller International. This is Gary's first time to have his extraordinary work published and I want to send him a huge congratulations - way to go Gary!
The Italeri Staghound Mk. 1 Late Version is modeled in the
colors and markings of the Polish 2nd Corps, Italy, 1944. The build
was extremely fun and straightforward with only minor cleanup and minor fit
issues. To increase the accuracy of the model, I added weld beads and casting
marks, scratch built handles, tool support brackets, an antennae base, and
replaced the kit gun barrels with a 37 mm and .30 cal from Barrel Depot.
DRMM is proud to announce that site contributor Gary Boggs and his Staghound have been published in the February, 2013 issue of Scale Military Modeller International. This is Gary's first time to have his extraordinary work published and I want to send him a huge congratulations - way to go Gary!
Priming and base painting were done with an Iwata HP-CS
using Vallejo primer, then a coat of Tamiya XF-1 Flat Black. The base yellow is
a 60/40 mix of XF-60 Dark Yellow and XF-4 Yellow Green. The green camo was then
airbrushed freehand using an Iwata HP-B+ using XF-64 Nato Green. All paints
were thinned with Tamiya Yellow Top Lacquer Thinner.
Next came a gloss coat to protect the camo from the
weathering steps and to provide a good base for decals. After the decals were
applied, the model was given a flat coat, chipping was applied, and several
weathering steps ensued using oils and pigments.
Finally, some parts from the Legends Staghound stowage kit
were painted and added to the model, along with some scratch built tarps and
bed rolls made with Milliput. All detail painting was done using Vallejo
acrylics.
To see the complete and detailed Armorama build log for this
project, go here: http://armorama.kitmaker.net/modules.php?op=modload&name=SquawkBox&file=index&req=viewtopic&topic_id=186850&page=1
Thursday, January 24, 2013
Scale 75 Lt. Dick Winters - Part 1
Read Part II Here
Part 1 of the excellent Scale 75 Lt. Winters kit. The kit is cast in white metal and is sculpted by Fernando Martin. Box art is outstanding and is the work of Samuel Perez.
At this point I have assembled the kit using 5 minute epoxy and have attached it to an African Rosewood base by Ken Thomas Art Bases. I have begun the Vallejo base painting and outlining process on the body, but have yet to start painting the head and face. More to come as progress is made!
Part 1 of the excellent Scale 75 Lt. Winters kit. The kit is cast in white metal and is sculpted by Fernando Martin. Box art is outstanding and is the work of Samuel Perez.
At this point I have assembled the kit using 5 minute epoxy and have attached it to an African Rosewood base by Ken Thomas Art Bases. I have begun the Vallejo base painting and outlining process on the body, but have yet to start painting the head and face. More to come as progress is made!
Thursday, December 27, 2012
Sd.Kfz.251/20 Ausf. D "Uhu" by Gary Boggs
This is the 1/35th scale AFV Club Sd.Kfz.251/20 Ausf. D "Uhu" by Gary Boggs. The kit is built with the addition of the Blast Models update set which contains resin updates mainly to the generator. The "Uhu" was produced with a large 60cm infra-red searchlight and was designed for night fighting with other IR equipped vehicles (Panther G and others).
The kit was airbrushed freehand with Tamiya acrylics and weathered with various oils and pigments.
Labels:
AFV Club,
Armor,
Blast Models,
Gary Boggs,
German,
MIG,
Sd.Kfz.251,
Tamiya,
Vallejo
Subscribe to:
Posts (Atom)